tiistai 28. helmikuuta 2017

Stars

Joining in three challenges with this mixed-media card: Our Mixed Media Moods (used the colours, blotches, tiles and stars on their moodboard), Paperartsy (I don't have blue infusions, but used Bister with gloss gel), and SanDee and Amelies steampunk challenge (new stash/forgotten stash, I used my new alcohol inks and a bunch of stuff that's been lying around for ages.


I had an old metal background in my stash. It's aluminium tape on card, and I've embossed it with a stencil from Designs By Ryn. A stencil doesn't give as deep impressions as a folder, but it's a way to get a favourite pattern embossed. I had originally coloured it with light green alcohol inks, and now I took out my new inks in denim, eggplant and slate... I went for a blotchy inky look, but it really didn't work out for me! Still need quite a lot of practice with those inks.


I created the tile effect with gloss gel on waxed kraft paper (Paperartsy). I sprinkled blue bister crystals on the wet gel and got some nice spotty tiles. Then I spritzed with a bunch of sprays, bothe mica and not. Both the paper and the gel resist the colours, but ... it just works anyway. I dried the sprays with my heat gun, and tore a piece of suitable size.


I sewed together my papers and some metal stars that I've dug from a trash bin (there's a metal-company near us, they make lanterns with star-shaped openings... and throw away the  cutout stars!). I decided to sew the stars in place, perhaps gel medium would have worked too, but I think this is quite cool.


I twirled the twine several times wondering how I could get it to work without bulging the card. This was the best I came up with: pieces of corrugated cardboard so there is space for the bundle of twine. I laid this on my card base  under pressure for a while before adding the dimensional Finnabair stars.


Here you can see the sewing over the stars and the way the heatgun boiled the gloss gel.


I like how the torn kraft papers give light frames to the otherwise dark surface :)


maanantai 27. helmikuuta 2017

Graffiti

A quick card for the VivaLasVegaStamps Graffiti -themed February challenge (splatters, drips, dots, orange, banksy...) and the Country View crafts February challenge (time challenge, max 30 minutes). Had a bit of a hurry with the embossing and fussy cutting, but the background was a ready piece from my stash :)


I just love this little Banksy rat balancing on a chain. I heat embossed him with black embossing ink, continued the line of the chain first with a black marker, then with an embossing pen and embossing powder. A touch of fussy cutting, and my focal point was ready. It has been mounted on thin strips of foam tape. The background is from last summer: Brusho colours dripped and dropped on ink jet photo paper. Love the effect! I stamped the background with stamps from VivaLasVegaStamps and Archival inks in black and grey.


sunnuntai 26. helmikuuta 2017

Gelliprints and doodles

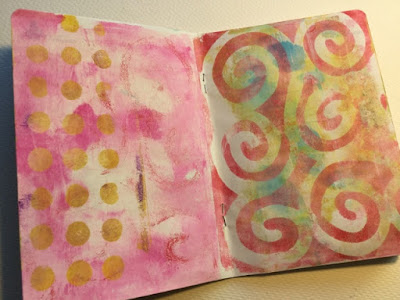
The Paperartsy challenge for thee pat 3 weeks has been asking for masks. After wondering how I could find time to do something for the challenge, I realized that I actually have this WIP notebook. It's small, about A5, and I gelliprinted all the pages before starting to doodle.


I used acrylic paints and a few masks (swirls, a doily and some blobs on sticks) and a dot stencil. 


My idea is to use this notebook for doodles. I started Rae Missigmans Art marks-challenge. It's long past, and I haven't done all thirty of the marks, but I'll continue filling in the pages (and perhaps later find out what more I want to do with them. The gelli-printing gives a nice tarting point, I'd feel quite intimidated with the blank page, since doodling is out of my comfort zone. 

before

after


sunnuntai 19. helmikuuta 2017

A little fragile

A last take on the fabuluos mood board at Our Mixed Media Moods. I used the gorgeous deep red, the lead grey, fibres and butterflies. I'm also posting for the Designs By Ryn customer creations challenge and the Craft Stamper Take it Make it challenge (anything with stamping goes). I usually do cards and work in my art journal, but this is a wall hanging (as soon as I find a way to hang it up...)

On Thursday evenings I have a furniture class, where I'm working on fixing an old sofa. The class is tought in secondary school craft classrooms, and I dug into the trash bins in the woodwork room (found some nice square panels) and in the metalwork room, where some students had been practising welding... from trash to treasure that is! I covered the wood with bookpaper and painted over it with acrylic paints (golden quinacridone crimson, magenta and violet) and layered on some fabric and the metal square. These were simply fastened with some small nails.


I stamped the moth (Designs by Ryn) and sentiment (Dina Wakley) with Versafine Onyx Black and heat embossed with clear embossing powder. The moth got some colour with the same acrylics I used in the background. I adhered the sentiment on the side of the panel, kind of as a bonus detail for someone who cares to take a second look at the project. I love the contrast of the fabric and metal!


torstai 9. helmikuuta 2017

Melanthium vulgari

Posting for the challenge at Our Mixed Media Moods. They have a beautiful moodboard, from which I took the deep wine red colour, texture, fabric/threads and black and white florals. I'm also posting for the VivaLasVegaStamps challenge (used reds, oranges, pinks, purples, splatters, drips and drops, check their moodboard behind the link) and the Craft Stamper take-it-make-it challenge where anything with stamping goes.


I made the background by scraping heavy body acrylic paints on a card with black gesso. I used some texture paste and heat embossed it with sparkly pink embossing powder. I didn't like the effect (it turned somewhat silvery) and continued with the acrylic paint, making it thick layers and continuing with the palette knife.  I mostly let the paint airdry, even though the heat gun gave some lovely bubbles (when I tried the heat embossing). The embossing powder still shows, but just as a gritty texture, which I like. All the stamps I used are from VivaLasVegaStamps: the lovely detailed flower in the foreground , the ledger and some botanicals and a plate number (the plate with the melanthium vulgari) in the background. 


Red!

A spread in my art "new" art journal, an old book. The layout and text are inspired by Wanderlust 2017, the colours inspired by the Our Mixed Media moodboard (reds, black and white, flowers) and Art Journal Journey (50 shades of red). Both calling to get me of my comfort zone. I have two drawers full of acrylic paints, and managed to find one red tube!


I started with gesso and spread squirts of red, orange and pink paints with a spatula and smooched the pages together. The red became a bit more dominant than I had thought, but I like it. I stamped flowers on book paper (Stampotique flower cube and Jofy from Paperartsy), fussy cut them and some leave from the leftover paper and adhered with gel medium. Doodles with sharpie pens... and spring stamped with the Everything Art letters from Paperartsy.


White

I want to document my spreads, so here goes... inspired by the Wanderlust 2017 online course : a very simple spread using mainly a permanent marker and white acrylic paint.


We've had some remarkable foggy days lately. Usually the air in winter is quite dry, and you don't have fog. But at the end of January, the fog was so strong, it was as if the air itself was white (along with the frost that had stuck on everything. I decided to try just drawing with black and using thinned out white paint to make the background gradually dissappear. I really like the second phase shown under, and if I could roll backward, I might stop there... but at least I have a picture of it!


I tried a bit of journaling, but I didn't like it so I covered it with white paint. The bubbled turned up when I heated the embossing powder (my altered book has pages glued together... see starting post here.)


Wanderlust 2017

I'm taking the Wanderlust 2017 online class. It's the first time I've ever paid for online classes, and this will continue all year long. I decided to alter an old book for the classes, and I now have a few spreads done. Here's the first one. I have decided to try and do a bit of crafting EVERY DAY. Hope it works out!


I thinned out the first third of the book, cutting out the middle two of every four pages and gluing the remaining pages together. I'll continue thinning it as I work forward, if I have a bulk of pages left at the end of the year, I'll make a niche... but if I end up filling the book, that's fine too :) here you can see the thinned part. The darker strip at the bottom of the page is were the leftovers of the cut out pages are glued in between two whole pages. I used a moist glue to begin with and the pages warped quite a bit... so I changed to a stick glue (of course burnished thoroughly!) To be seen if it has an effect on what I can do with the spreads!